Indy
Misfit
- User ID
- 57
Some time back @elsooto mentioned about my ScrOG screen to someone. So while i've had it out and prepping it for another grow i thought i'd take some pics and potentially explain the design.
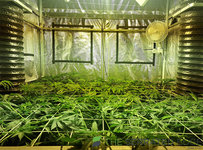
First i set out with the idea of coming up with something that was freestanding, and consisted of two separate screens just in case i needed something to tame those pesky Sativa's indoors at some time. So this is what i came up with..
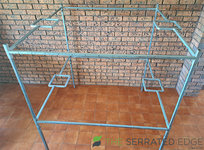
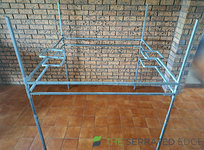
Essentially it's the two 1.35m square screens that are adjustable in height. The screen's can be set at any height between 720mm and 1620mm. The legs are adjustable in height as well between 1090mm and 1600mm. And it can be completely assembled and adjusted with a single Allen Key.
The shopping list come in around $150 mark (i think), and consisted of the parts below..
Duragal Steel
16mm x 16mm @1.6mm
20mm x 20mm @1.6mm
25mm x 25mm @1.6mm
3/8" Nuts
3/8" Grub Screws
25mm Plastic Feet
Zinc Paint (GalMax)

I guess the main part that brings it altogether is the 8 Corner brackets that need to be made. Using the 25mm and 16mm box steel, drill 2 holes in the 25mm and weld a couple of nuts on, then weld the 16mm box squarely onto 25mm. It's paramount to ensure these brackets end up as square as possible. As it will become apparent how small the tolerances are due to the minimal gap between each size of steel used. In fact, the trick to assembling it is to put it together loosely within the grow space, and tighten it as you go setting the screens and legs at the required heights.
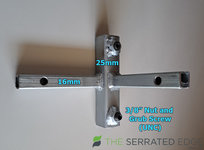
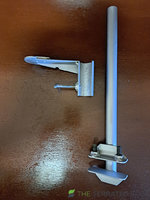
And here's how a corner leg looks complete. Down the bottom is 25mm by 675mm leg, that has a 20mm by 1075 box which slides within it, to which then has the corner brackets that can be set off of that. Then to complete the screens, it has 4 x 20mm by 1350mm sections that slide over the 16mm box on the brackets, and the locked on by tightening the grub screws.

And once completed, give it all a clean up and a hit of zinc paint, and bung the plastic feet on. Because you don't want to be punching holes through the bottom of your tent or whatever. Also you'll see the nut welded onto the bottom of the leg. The reasoning for that was just in case there was ever a plant that was hard to tame, and was able to lift the frame. I could then screw bolts into the nuts and place something heavy like a brick or sandbag on the bolt to weigh it down further if it was ever required. Highly unlikely, but yeah..

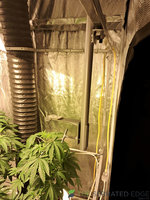
As you'll see with mine, it has those dickey square bits on two sides. That's there so i can run ducting down from the ceiling into the bottom of my tent. In most cases that's not required, and you can utilise a simple 1350mm length of 20mm box.
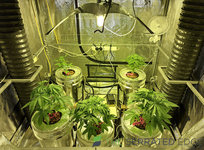
I'm currently waiting to sex my current lot of plants. Once that done, i'll come back with some pics of the screen/s all stringed up, etc..
First i set out with the idea of coming up with something that was freestanding, and consisted of two separate screens just in case i needed something to tame those pesky Sativa's indoors at some time. So this is what i came up with..


Essentially it's the two 1.35m square screens that are adjustable in height. The screen's can be set at any height between 720mm and 1620mm. The legs are adjustable in height as well between 1090mm and 1600mm. And it can be completely assembled and adjusted with a single Allen Key.
The shopping list come in around $150 mark (i think), and consisted of the parts below..
Duragal Steel
16mm x 16mm @1.6mm
20mm x 20mm @1.6mm
25mm x 25mm @1.6mm
3/8" Nuts
3/8" Grub Screws
25mm Plastic Feet
Zinc Paint (GalMax)

I guess the main part that brings it altogether is the 8 Corner brackets that need to be made. Using the 25mm and 16mm box steel, drill 2 holes in the 25mm and weld a couple of nuts on, then weld the 16mm box squarely onto 25mm. It's paramount to ensure these brackets end up as square as possible. As it will become apparent how small the tolerances are due to the minimal gap between each size of steel used. In fact, the trick to assembling it is to put it together loosely within the grow space, and tighten it as you go setting the screens and legs at the required heights.

And here's how a corner leg looks complete. Down the bottom is 25mm by 675mm leg, that has a 20mm by 1075 box which slides within it, to which then has the corner brackets that can be set off of that. Then to complete the screens, it has 4 x 20mm by 1350mm sections that slide over the 16mm box on the brackets, and the locked on by tightening the grub screws.

And once completed, give it all a clean up and a hit of zinc paint, and bung the plastic feet on. Because you don't want to be punching holes through the bottom of your tent or whatever. Also you'll see the nut welded onto the bottom of the leg. The reasoning for that was just in case there was ever a plant that was hard to tame, and was able to lift the frame. I could then screw bolts into the nuts and place something heavy like a brick or sandbag on the bolt to weigh it down further if it was ever required. Highly unlikely, but yeah..

As you'll see with mine, it has those dickey square bits on two sides. That's there so i can run ducting down from the ceiling into the bottom of my tent. In most cases that's not required, and you can utilise a simple 1350mm length of 20mm box.

I'm currently waiting to sex my current lot of plants. Once that done, i'll come back with some pics of the screen/s all stringed up, etc..


