ScrOG Screen

Indy

Misfit
User ID
57
Some time back @elsooto mentioned about my ScrOG screen to someone. So while i've had it out and prepping it for another grow i thought i'd take some pics and potentially explain the design.

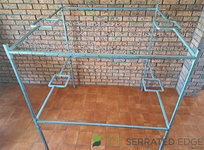
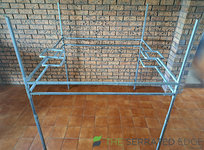
First i set out with the idea of coming up with something that was freestanding, and consisted of two separate screens just in case i needed something to tame those pesky Sativa's indoors at some time. So this is what i came up with..
001.jpg

002.jpg

Essentially it's the two 1.35m square screens that are adjustable in height. The screen's can be set at any height between 720mm and 1620mm. The legs are adjustable in height as well between 1090mm and 1600mm. And it can be completely assembled and adjusted with a single Allen Key.

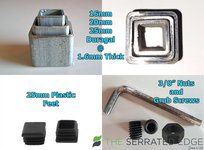
The shopping list come in around $150 mark (i think), and consisted of the parts below..

Duragal Steel
16mm x 16mm @1.6mm
20mm x 20mm @1.6mm
25mm x 25mm @1.6mm

3/8" Nuts
3/8" Grub Screws
25mm Plastic Feet
Zinc Paint (GalMax)


003.jpg

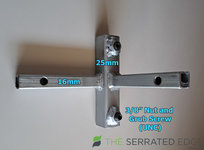
I guess the main part that brings it altogether is the 8 Corner brackets that need to be made. Using the 25mm and 16mm box steel, drill 2 holes in the 25mm and weld a couple of nuts on, then weld the 16mm box squarely onto 25mm. It's paramount to ensure these brackets end up as square as possible. As it will become apparent how small the tolerances are due to the minimal gap between each size of steel used. In fact, the trick to assembling it is to put it together loosely within the grow space, and tighten it as you go setting the screens and legs at the required heights.
004.jpg

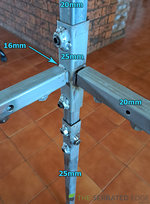
And here's how a corner leg looks complete. Down the bottom is 25mm by 675mm leg, that has a 20mm by 1075 box which slides within it, to which then has the corner brackets that can be set off of that. Then to complete the screens, it has 4 x 20mm by 1350mm sections that slide over the 16mm box on the brackets, and the locked on by tightening the grub screws.
005.jpg

And once completed, give it all a clean up and a hit of zinc paint, and bung the plastic feet on. Because you don't want to be punching holes through the bottom of your tent or whatever. Also you'll see the nut welded onto the bottom of the leg. The reasoning for that was just in case there was ever a plant that was hard to tame, and was able to lift the frame. I could then screw bolts into the nuts and place something heavy like a brick or sandbag on the bolt to weigh it down further if it was ever required. Highly unlikely, but yeah..
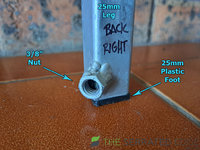
006.jpg

As you'll see with mine, it has those dickey square bits on two sides. That's there so i can run ducting down from the ceiling into the bottom of my tent. In most cases that's not required, and you can utilise a simple 1350mm length of 20mm box.
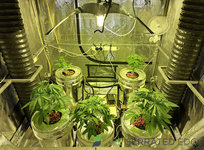
007.jpg

I'm currently waiting to sex my current lot of plants. Once that done, i'll come back with some pics of the screen/s all stringed up, etc..
 

Please join our community to continue reading

Forgot your password?
Don't have an account? Register now

Old Ant

Vegetating
User ID
3355
Some time back @elsooto mentioned about my ScrOG screen to someone. So while i've had it out and prepping it for another grow i thought i'd take some pics and potentially explain the design.

First i set out with the idea of coming up with something that was freestanding, and consisted of two separate screens just in case i needed something to tame those pesky Sativa's indoors at some time. So this is what i came up with..

View attachment 33600

View attachment 33601

Essentially it's the two 1.35m square screens that are adjustable in height. The screen's can be set at any height between 720mm and 1620mm. The legs are adjustable in height as well between 1090mm and 1600mm. And it can be completely assembled and adjusted with a single Allen Key.

The shopping list come in around $150 mark (i think), and consisted of the parts below..

Duragal Steel
16mm x 16mm @1.6mm
20mm x 20mm @1.6mm
25mm x 25mm @1.6mm

3/8" Nuts
3/8" Grub Screws
25mm Plastic Feet
Zinc Paint (GalMax)


View attachment 33602

I guess the main part that brings it altogether is the 8 Corner brackets that need to be made. Using the 25mm and 16mm box steel, drill 2 holes in the 25mm and weld a couple of nuts on, then weld the 16mm box squarely onto 25mm. It's paramount to ensure these brackets end up as square as possible. As it will become apparent how small the tolerances are due to the minimal gap between each size of steel used. In fact, the trick to assembling it is to put it together loosely within the grow space, and tighten it as you go setting the screens and legs at the required heights.

View attachment 33604

And here's how a corner leg looks complete. Down the bottom is 25mm by 675mm leg, that has a 20mm by 1075 box which slides within it, to which then has the corner brackets that can be set off of that. Then to complete the screens, it has 4 x 20mm by 1350mm sections that slide over the 16mm box on the brackets, and the locked on by tightening the grub screws.

View attachment 33605

And once completed, give it all a clean up and a hit of zinc paint, and bung the plastic feet on. Because you don't want to be punching holes through the bottom of your tent or whatever. Also you'll see the nut welded onto the bottom of the leg. The reasoning for that was just in case there was ever a plant that was hard to tame, and was able to lift the frame. I could then screw bolts into the nuts and place something heavy like a brick or sandbag on the bolt to weigh it down further if it was ever required. Highly unlikely, but yeah..

View attachment 33606

As you'll see with mine, it has those dickey square bits on two sides. That's there so i can run ducting down from the ceiling into the bottom of my tent. In most cases that's not required, and you can utilise a simple 1350mm length of 20mm box.

View attachment 33607

I'm currently waiting to sex my current lot of plants. Once that done, i'll come back with some pics of the screen/s all stringed up, etc..
Hello Indy, that is a seriously beautiful and meticulously organised setup👏 One of the best I have ever had the pleasure to see🤗
 

Love to grow

Foot man
User ID
827
N
Some time back @elsooto mentioned about my ScrOG screen to someone. So while i've had it out and prepping it for another grow i thought i'd take some pics and potentially explain the design.

First i set out with the idea of coming up with something that was freestanding, and consisted of two separate screens just in case i needed something to tame those pesky Sativa's indoors at some time. So this is what i came up with..

View attachment 33600

View attachment 33601

Essentially it's the two 1.35m square screens that are adjustable in height. The screen's can be set at any height between 720mm and 1620mm. The legs are adjustable in height as well between 1090mm and 1600mm. And it can be completely assembled and adjusted with a single Allen Key.

The shopping list come in around $150 mark (i think), and consisted of the parts below..

Duragal Steel
16mm x 16mm @1.6mm
20mm x 20mm @1.6mm
25mm x 25mm @1.6mm

3/8" Nuts
3/8" Grub Screws
25mm Plastic Feet
Zinc Paint (GalMax)


View attachment 33602

I guess the main part that brings it altogether is the 8 Corner brackets that need to be made. Using the 25mm and 16mm box steel, drill 2 holes in the 25mm and weld a couple of nuts on, then weld the 16mm box squarely onto 25mm. It's paramount to ensure these brackets end up as square as possible. As it will become apparent how small the tolerances are due to the minimal gap between each size of steel used. In fact, the trick to assembling it is to put it together loosely within the grow space, and tighten it as you go setting the screens and legs at the required heights.

View attachment 33604

And here's how a corner leg looks complete. Down the bottom is 25mm by 675mm leg, that has a 20mm by 1075 box which slides within it, to which then has the corner brackets that can be set off of that. Then to complete the screens, it has 4 x 20mm by 1350mm sections that slide over the 16mm box on the brackets, and the locked on by tightening the grub screws.

View attachment 33605

And once completed, give it all a clean up and a hit of zinc paint, and bung the plastic feet on. Because you don't want to be punching holes through the bottom of your tent or whatever. Also you'll see the nut welded onto the bottom of the leg. The reasoning for that was just in case there was ever a plant that was hard to tame, and was able to lift the frame. I could then screw bolts into the nuts and place something heavy like a brick or sandbag on the bolt to weigh it down further if it was ever required. Highly unlikely, but yeah..

View attachment 33606

As you'll see with mine, it has those dickey square bits on two sides. That's there so i can run ducting down from the ceiling into the bottom of my tent. In most cases that's not required, and you can utilise a simple 1350mm length of 20mm box.

View attachment 33607

I'm currently waiting to sex my current lot of plants. Once that done, i'll come back with some pics of the screen/s all stringed up, etc..
Nice man great setup ya lost me at weld though I’d be better off with duct tape can’t weld for shit I noticed that beautiful orange glow of the hps though nice to c another hps grower on here👍
 

Orb

Curing
Community Member
User ID
3232
Some time back @elsooto mentioned about my ScrOG screen to someone. So while i've had it out and prepping it for another grow i thought i'd take some pics and potentially explain the design.

First i set out with the idea of coming up with something that was freestanding, and consisted of two separate screens just in case i needed something to tame those pesky Sativa's indoors at some time. So this is what i came up with..

View attachment 33600

View attachment 33601

Essentially it's the two 1.35m square screens that are adjustable in height. The screen's can be set at any height between 720mm and 1620mm. The legs are adjustable in height as well between 1090mm and 1600mm. And it can be completely assembled and adjusted with a single Allen Key.

The shopping list come in around $150 mark (i think), and consisted of the parts below..

Duragal Steel
16mm x 16mm @1.6mm
20mm x 20mm @1.6mm
25mm x 25mm @1.6mm

3/8" Nuts
3/8" Grub Screws
25mm Plastic Feet
Zinc Paint (GalMax)


View attachment 33602

I guess the main part that brings it altogether is the 8 Corner brackets that need to be made. Using the 25mm and 16mm box steel, drill 2 holes in the 25mm and weld a couple of nuts on, then weld the 16mm box squarely onto 25mm. It's paramount to ensure these brackets end up as square as possible. As it will become apparent how small the tolerances are due to the minimal gap between each size of steel used. In fact, the trick to assembling it is to put it together loosely within the grow space, and tighten it as you go setting the screens and legs at the required heights.

View attachment 33604

And here's how a corner leg looks complete. Down the bottom is 25mm by 675mm leg, that has a 20mm by 1075 box which slides within it, to which then has the corner brackets that can be set off of that. Then to complete the screens, it has 4 x 20mm by 1350mm sections that slide over the 16mm box on the brackets, and the locked on by tightening the grub screws.

View attachment 33605

And once completed, give it all a clean up and a hit of zinc paint, and bung the plastic feet on. Because you don't want to be punching holes through the bottom of your tent or whatever. Also you'll see the nut welded onto the bottom of the leg. The reasoning for that was just in case there was ever a plant that was hard to tame, and was able to lift the frame. I could then screw bolts into the nuts and place something heavy like a brick or sandbag on the bolt to weigh it down further if it was ever required. Highly unlikely, but yeah..

View attachment 33606

As you'll see with mine, it has those dickey square bits on two sides. That's there so i can run ducting down from the ceiling into the bottom of my tent. In most cases that's not required, and you can utilise a simple 1350mm length of 20mm box.

View attachment 33607

I'm currently waiting to sex my current lot of plants. Once that done, i'll come back with some pics of the screen/s all stringed up, etc..

Indy mate, first the balls vape and now this mad setup. Got some seriously handy skills!

Ya really makin me feel like the useless dumb fuck that I am!!
 

Harry bootlace

Baked
Community Member
User ID
411
Nifty. Another here who couldn’t even begin to attempt something like this. I have trouble hammering a nail. But well done you.
 

Love to grow

Foot man
User ID
827
Lol,,,You blokes are a dying breed.

The higher returns on the HLG will pay for itself on the first grow you do.

Glad I made the switch.
She gets cold down here in Tas though Sedge it’s the only reason I haven’t led yet👍 I’d only get 1 summer grow a year out of em.
 

Orb

Curing
Community Member
User ID
3232
Ya might be shit at heaps of stuff mate but ya self deprecating humour is first class!! 🤣
happy starting from the back of the class Porky

seen so much useful shit this past few weeks on TSE, it’s been so fackin interesting tbh

can’t wait to get the fuck outta the cbd and have a shed n patch - will be tappin good kunts like Indy up loads unless he keeps up de class instructions n pics
 

Indy

Misfit
User ID
57
Awesome set up where did u get those buckets unreal idea

I've had little choice at both times of purchase to go this type of 20 Litre Bucket and cover them in Aluminum Tape as to block out the light from penetrating the bucket and getting to the roots (roots dont like light apparently). Ideally, i would've preferred to go with 20L Black Buckets as to what most folks use in DWC.

I have since found a mob locally who can make a 35 litre which is the size i prefer. But they're going to set me back $60 a piece and want 3 months to schedule them into their production schedule. A bit expensive, but the fuckers are heavy duty and would see me out..
 

Indy

Misfit
User ID
57
Indy mate, first the balls vape and now this mad setup. Got some seriously handy skills!

Ya really makin me feel like the useless dumb fuck that I am!!

Not at all, mate. We all have something we can turn a hand to and get good results.

For instance, i know me way around a backyard shed pretty well, but yet i'm a dud root in the bedroom. See, that's probably an area that you have it in spades over me.. (y)
 

Jase

Vegetating
Community Member
User ID
2434
I've had little choice at both times of purchase to go this type of 20 Litre Bucket and cover them in Aluminum Tape as to block out the light from penetrating the bucket and getting to the roots (roots dont like light apparently). Ideally, i would've preferred to go with 20L Black Buckets as to what most folks use in DWC.

I have since found a mob locally who can make a 35 litre which is the size i prefer. But they're going to set me back $60 a piece and want 3 months to schedule them into their production schedule. A bit expensive, but the fuckers are heavy duty and would see me out..
Mate is black pots better for heat reason or something else looking at going that sort of setup
 

OZIOZIAUTO

Baked
User ID
2870
Some time back @elsooto mentioned about my ScrOG screen to someone. So while i've had it out and prepping it for another grow i thought i'd take some pics and potentially explain the design.

First i set out with the idea of coming up with something that was freestanding, and consisted of two separate screens just in case i needed something to tame those pesky Sativa's indoors at some time. So this is what i came up with..

View attachment 33600

View attachment 33601

Essentially it's the two 1.35m square screens that are adjustable in height. The screen's can be set at any height between 720mm and 1620mm. The legs are adjustable in height as well between 1090mm and 1600mm. And it can be completely assembled and adjusted with a single Allen Key.

The shopping list come in around $150 mark (i think), and consisted of the parts below..

Duragal Steel
16mm x 16mm @1.6mm
20mm x 20mm @1.6mm
25mm x 25mm @1.6mm

3/8" Nuts
3/8" Grub Screws
25mm Plastic Feet
Zinc Paint (GalMax)


View attachment 33602

I guess the main part that brings it altogether is the 8 Corner brackets that need to be made. Using the 25mm and 16mm box steel, drill 2 holes in the 25mm and weld a couple of nuts on, then weld the 16mm box squarely onto 25mm. It's paramount to ensure these brackets end up as square as possible. As it will become apparent how small the tolerances are due to the minimal gap between each size of steel used. In fact, the trick to assembling it is to put it together loosely within the grow space, and tighten it as you go setting the screens and legs at the required heights.

View attachment 33604

And here's how a corner leg looks complete. Down the bottom is 25mm by 675mm leg, that has a 20mm by 1075 box which slides within it, to which then has the corner brackets that can be set off of that. Then to complete the screens, it has 4 x 20mm by 1350mm sections that slide over the 16mm box on the brackets, and the locked on by tightening the grub screws.

View attachment 33605

And once completed, give it all a clean up and a hit of zinc paint, and bung the plastic feet on. Because you don't want to be punching holes through the bottom of your tent or whatever. Also you'll see the nut welded onto the bottom of the leg. The reasoning for that was just in case there was ever a plant that was hard to tame, and was able to lift the frame. I could then screw bolts into the nuts and place something heavy like a brick or sandbag on the bolt to weigh it down further if it was ever required. Highly unlikely, but yeah..

View attachment 33606

As you'll see with mine, it has those dickey square bits on two sides. That's there so i can run ducting down from the ceiling into the bottom of my tent. In most cases that's not required, and you can utilise a simple 1350mm length of 20mm box.

View attachment 33607

I'm currently waiting to sex my current lot of plants. Once that done, i'll come back with some pics of the screen/s all stringed up, etc..
Nice work mate,I don't mind a bit of welding
1.6 mm would have been fun to work with !!
Looks like u used a stick ?

Impressive none the less.

I noticed u only have one fan , is that enuff to keep the room cool with HPS....

I know fuck all about those lights and am actually looking in to them now...some recommend Mh over hps,what are your thoughts???

Have you run that set up before ?
 

Indy

Misfit
User ID
57
Mate is black pots better for heat reason or something else looking at going that sort of setup

Well, there's differing opinions. Some say roots shouldn't be exposed to light. Others are on the flip side and doesn't think it matters. As for myself, i prefer to err on the side of caution and keep them covered as much as possible.

As for the black buckets and heat. I wouldn't know, mate. I'd imagine they'd retain a bit more heat than most, but then it'd come down to how thick the buckets are as well.
Nice work mate,I don't mind a bit of welding
1.6 mm would have been fun to work with !!
Looks like u used a stick ?

Impressive none the less.

I noticed u only have one fan , is that enuff to keep the room cool with HPS....

I know fuck all about those lights and am actually looking in to them now...some recommend Mh over hps,what are your thoughts???

Have you run that set up before ?

I've got a couple of 150w MH bulbs here, but they've only been used for mother/clone cabinet. But otherwise, I'm content with the results i get with HPS throughout an entire grow.
 

Indy

Misfit
User ID
57
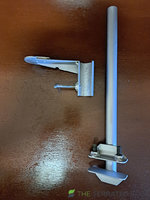
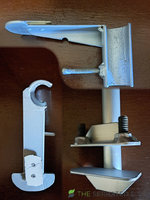
Made a couple of other bits up for the frame. Well, i whipped up the camera clamp a month or so back so that it can be attached to the poles in the tent. But it eventually occurred to me that it'd be better attached to the scrog frame instead, due to how thin the tent poles are. So that's why this other bracket came about so i can bolt that to the frame. I made the gap large enough to accommodate 25mm box steel, but it'll mainly be attached to 20mm box in the tent..

001.jpg 002.jpg

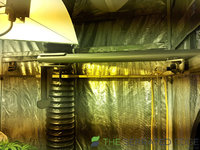
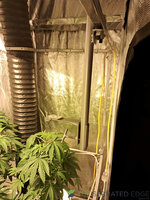
Here it is fixed horizontally and vertically..

003.jpg 004.jpg
 

Indy

Misfit
User ID
57
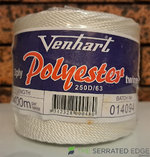
Finally got around to stringing up the screen with Butcher's Twine, it's my preferred option due to durability and strength. T this is the second grow this twine has been used, and doesn't seem to break down under the light. Hit your butcher up, or get it off eBay for about $25-30 a roll, just be sure to get the 3ply type pictured below (if interested). There's thinner cheaper shit but it wont hold up and might cut through the plants..

001.jpg

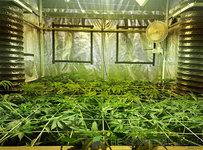
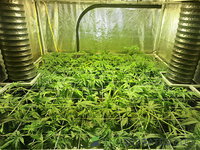
Anyway, had a bit of a overgrow situation going on whilst i was trying to sex the plants. But once i settled on the two girls i wanted to grow out, i had to turn a hand to them, to tame 'em down again so i could reclaim some ceiling height and make them more manageable.

When i thread up the screen i do use a interlace pattern (under 'n over) which seems help it interlock it all to some extent.
002.jpg

They're still in vegetative state, i'll grow them out over the next few days to fill the gaps in the screen, then flip over to flower.
003.jpg

EDIT: Think I may have forgot to mention that I made the strings 100mm apart. From the couple of screens I've made in the past, that's what seems to best suit me. As I have had to pull a plant out of a screen once before, and having this spacing appeared to be a blessing. If the mesh size was smaller I probably would've lost the plant.

That's about it. (y)
 
Last edited:
Top Bottom