You are using an out of date browser. It may not display this or other websites correctly.
You should upgrade or use an alternative browser.
You should upgrade or use an alternative browser.
Rosin press
- Thread starter Hudo
- Start date
Please join our community to continue reading
or
- User ID
- 1876
I tried the glad and same happensBaking paper is no good (imo). It wept through that as well when I done a test run with a hair straightener just recently.
Yamumzbum
Curing
- User ID
- 1301
About the material, it has to be moist enough around 65% of humidity. If your material is too dry, you can put it into container with a piece of orange peel or potato peel and leave it overnight. Next day your material will be ready to press.
The temperature is optional it determines the fluidity. I prefer a lower temp around 90-95 Celsius degrees to keep the terpenes and to get a more sticky extraction easy to work on it.
The pressing has to be slow. I like to press just a bit, keeping for 30-60 seconds to gain temperature of the material. It helps to decarboxylate and to prepare the material for the pressing. After that I like to press around half-way and leave for another minute. Then start pressing slow and patient until you can see oil coming I usually stop when all the filter bag is oil covered. At that stage I start the timer for 3 minutes. When the timer reach 1,5 minutes I do a final press to squeeze all the remaining.
thefullspectrum
Curing
- User ID
- 869
Couldnt find anything with a pressure gauge within budget, so ended up with all this shit from Ali express and Ebay for a go at DIYing a set of caged plates.
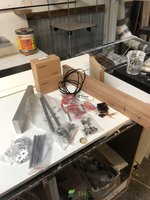
Told the mrs I desperately needed a 10 ton shop press with gauge for all those tedious pressing jobs that always pop up at home... Done!
Done! 
So at this stage 'Ive got all the gear yet still no idea! I'll cut that alum block in half so end up with 2/ 150 x 80mm plates.
Will control each plate through seperate PID's, and was planning on 3 heat rods per plate, 6 total running 720w. I'll knock up a little box to house the electrics.
Gunna use a bit of the wormy chestnut or American oak to mount the alum plates too for a thermal barrier, and to house the linear rails and springs on. Probably add a bit of 10-15mm steel over the timber as well top and bottom.
Just need some spare time to put her all together, should get all my pressing bags and parchment paper from Dulytek USA any day now. Best quality for the lowest price I found but I really have NFI.
Hopefully next time im reporting back i'll be squeezing out some sweet nectar and not wishing Id got a Dulytek 3 x 6 prefab.

Told the mrs I desperately needed a 10 ton shop press with gauge for all those tedious pressing jobs that always pop up at home...
So at this stage 'Ive got all the gear yet still no idea! I'll cut that alum block in half so end up with 2/ 150 x 80mm plates.
Will control each plate through seperate PID's, and was planning on 3 heat rods per plate, 6 total running 720w. I'll knock up a little box to house the electrics.
Gunna use a bit of the wormy chestnut or American oak to mount the alum plates too for a thermal barrier, and to house the linear rails and springs on. Probably add a bit of 10-15mm steel over the timber as well top and bottom.
Just need some spare time to put her all together, should get all my pressing bags and parchment paper from Dulytek USA any day now. Best quality for the lowest price I found but I really have NFI.
Hopefully next time im reporting back i'll be squeezing out some sweet nectar and not wishing Id got a Dulytek 3 x 6 prefab.
The Happy Camper
Germinating
- User ID
- 3137
thefullspectrum
Curing
- User ID
- 869
Yes! thats a beauty. Is that 3 heat cartridges and 2 temp sensors per plate? What type of PIDs are you running that have 2 temp sensors? im wondering where to put my sensors with only 1 per plate and a heat cartridge in the centre. the inkbird pid's were the most expensive bit at $35 each, everything else cheap as shit.Had a go at a diy effort not too long back. All but done. Just need to plug it in and test it. Ima little nervous not gonna lie.
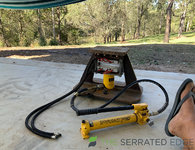
View attachment 34824
What about pressing bags and parchment? Any tips?
Indy
Misfit
- User ID
- 57
She's a pearler @The Happy Camper, love the use of a chunk of decent I-beam, lol. 
The Happy Camper
Germinating
- User ID
- 3137
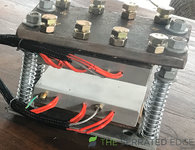
Cheers fullspectrum. I have used inkbirds as well. Just the one thermocouple per. The other is an earth wire. Attached thumbnail is close up of the caged plattens. I am nearly ready to start playing with it.
Dunno about bags and parchment. I will try making a pre press rosin mould thingy that matches my plate size.
From there i reckon some sort of parchment/paper that i can get on a roll. A long roll. Lol.
Thanks Indy. Heavy little fucker it is. Easier to move it around on a trolley.
Dunno about bags and parchment. I will try making a pre press rosin mould thingy that matches my plate size.
From there i reckon some sort of parchment/paper that i can get on a roll. A long roll. Lol.
Thanks Indy. Heavy little fucker it is. Easier to move it around on a trolley.

thefullspectrum
Curing
- User ID
- 869
Oh yes, Id forgot about earthing the plates. I specifically got 3 pin connectors for that purpose. 
Thats pretty much the same basic design as I was planning in regards to the plate /heat rod set up yet never seen any others around with 3 rods per plate. What's your thoughts/inspiration on the design. Also im very interested in what size your alum plates are? Thickness an inch? And what size heat rods and wattage did you go for? A lot of guesswork on my plan what about yourself? Love the little compact press, how many tonne is she.
Thats pretty much the same basic design as I was planning in regards to the plate /heat rod set up yet never seen any others around with 3 rods per plate. What's your thoughts/inspiration on the design. Also im very interested in what size your alum plates are? Thickness an inch? And what size heat rods and wattage did you go for? A lot of guesswork on my plan what about yourself? Love the little compact press, how many tonne is she.
thefullspectrum
Curing
- User ID
- 869
Hey mate, sorry for all the questions, but did you extend/solder a bit of wire on the stock heat rod wires. Mine are only about 300mm long would prefer a bit more length (Cheers fullspectrum. I have used inkbirds as well. Just the one thermocouple per. The other is an earth wire. Attached thumbnail is close up of the caged plattens. I am nearly ready to start playing with it.
Dunno about bags and parchment. I will try making a pre press rosin mould thingy that matches my plate size.
From there i reckon some sort of parchment/paper that i can get on a roll. A long roll. Lol.
Thanks Indy. Heavy little fucker it is. Easier to move it around on a trolley.
View attachment 34841
The Happy Camper
Germinating
- User ID
- 3137
I have been a dry sifter for the last few years.What's your thoughts/inspiration on the design. Also im very interested in what size your alum plates are? Thickness an inch? And what size heat rods and wattage did you go for? A lot of guesswork on my plan what about yourself? Love the little compact press, how many tonne is she.
Saw the presses and the rosin that was flowing out and got all excited......need i say more. Lol
figured i would try and make my version..........as small and as chunky as i could get it.
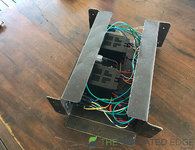
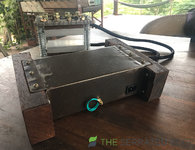
it was more complex than i had envisioned. It sort of broke itself up into 4 parts.
1. The controller enclosure 2. The wiring. 3. Caged platens. 4. Ibeam and jack
The ally plate size is 140 x 100 x 25. Pretty sure i purchased it through ebay. Rocked up in the mail in one piece like yours.
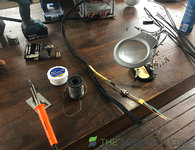
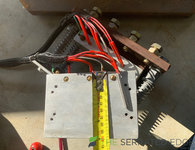
The heat rod cartridge heaters are 150w ea. The active wires are joined In the harness as well as the neutrals. They extend the short wires from the rods and present as orange and white in the loom photo. My thermocouples terminate in the jack as well. Im running 5 pinners. More for flexibility of being able to detach the pid controller from the plates with just the one socket more than anything else.
Earth wires from plates through the jacks, on to the brass post and pig tailed on the back of the enclosure. The earth from the mains iec 240v earth pin to that brass post also.
There was a bit of planning and guessing
Soldering was more difficult than i thought. Def need the flux.
The press itself is an offcut of a Universal Column UC310137. From local steel yard. Heavy as. The jack is a 20 tonner. Probably wont go half that to be honest. But then again, i suppose i could try and deform it once brave enough. Lol
Heaps of fun. Good luck with it. Will be watching on with interest.
thefullspectrum
Curing
- User ID
- 869
Yeah cheers mate appreciate all this info, exactly what im after! What is hard to solder? The heat rod wires to normal wiring? Or the connectors? I best get some flux to be sure.I have been a dry sifter for the last few years.
Saw the presses and the rosin that was flowing out and got all excited......need i say more. Lol
figured i would try and make my version..........as small and as chunky as i could get it.
it was more complex than i had envisioned. It sort of broke itself up into 4 parts.
1. The controller enclosure 2. The wiring. 3. Caged platens. 4. Ibeam and jack
The ally plate size is 140 x 100 x 25. Pretty sure i purchased it through ebay. Rocked up in the mail in one piece like yours.
The heat rod cartridge heaters are 150w ea. The active wires are joined In the harness as well as the neutrals. They extend the short wires from the rods and present as orange and white in the loom photo. My thermocouples terminate in the jack as well. Im running 5 pinners. More for flexibility of being able to detach the pid controller from the plates with just the one socket more than anything else.
Earth wires from plates through the jacks, on to the brass post and pig tailed on the back of the enclosure. The earth from the mains iec 240v earth pin to that brass post also.
There was a bit of planning and guessingI just made sure that the load of the heater elements didnt exceed the amperage rating of the inkbirds. The rest is giving it a crack and sorting out issues on the fly I suppose.
Soldering was more difficult than i thought. Def need the flux.
The press itself is an offcut of a Universal Column UC310137. From local steel yard. Heavy as. The jack is a 20 tonner. Probably wont go half that to be honest. But then again, i suppose i could try and deform it once brave enough. Lol
Heaps of fun. Good luck with it. Will be watching on with interest.
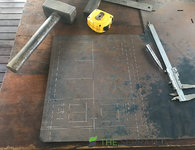
View attachment 34844View attachment 34845View attachment 34846View attachment 34847View attachment 34848
love the little grub screws holding the cartridges in, might do the same. Are you a fitter or something?
When do ya reckon you'll try her out?
The Happy Camper
Germinating
- User ID
- 3137
Soldering the wires onto the tiny tabs of switches / sockets etc. without applying too much heat to melt the plastic bodies. Lack of expierience on my part is all 
No fitter.........i dont mind trying to make things fit though.
The controller is in a box in a shipping container waiting for my shed to be built. The good news for me is the shed has just been built. Fucken yay. Lol.
So hopefully within the next few weeks.
What about you?
How long do you reckon it will take you to knock it up? Shop press sounds good. What size packet will you be squashing and what sort of pressure are you aiming for?
thefullspectrum
Curing
- User ID
- 869
Bags and shit turned up today so no excuses now.Soldering the wires onto the tiny tabs of switches / sockets etc. without applying too much heat to melt the plastic bodies. Lack of expierience on my part is all
No fitter.........i dont mind trying to make things fit though.
The controller is in a box in a shipping container waiting for my shed to be built. The good news for me is the shed has just been built. Fucken yay. Lol.
So hopefully within the next few weeks.
What about you?
How long do you reckon it will take you to knock it up? Shop press sounds good. What size packet will you be squashing and what sort of pressure are you aiming for?
I did a couple of hours on her this arvo, Only got the timber plates drilled and routed out to take the rails and half the box to house the electrics made up. I reckon theres at least another 4-5 of those sessions before Im even close to ready.
Yeah I had a close look at the connectors, fuck they will be a prick to solder. Looks like the tiny ends can be crimped on to the wire before soldering, Is that the go? And in hindsight the 5 pin would have been perfect for just 1 plug per PID like you did. I'll need 2 per PID. Seperate temp sensors. The 3 pin are pretty crowded, the 5 would be almost touching each other can see why you have the magnifying glass.
This little project will make or break me I reckon
thefullspectrum
Curing
- User ID
- 869
As expected the mechanical side of the build was straightforward, with no worries.
But electrical... Fuck me I near threw the prick against the wall a few times. Thankfully there were some sacrificial lambs laying around nearby for that instead.
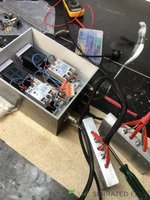
The supplied inkbird wiring diagram is lacking, it doesnt really show the SSR needs AC in as well as the -+ DC from the controller, Probably obvious to anyone in the know, but I needed to watch a few youtube vids to nut that out.
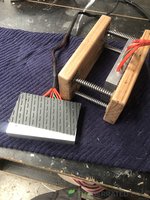
was a bit concerned on how the timber will handle the heat long term without cupping etc. Got the missos oven mitt and used the silicone outer. Ribbed for her pleasure!
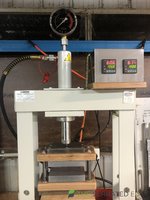
Screwed some 20mm steel plate on top and bottom, ready to go.
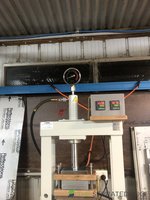
Testing 123... Heated her up and give her 2 tonnes for about 20 minutes.
THE MAIN ISSUE:
I wanted to be able to disconnect the leads from controller, so had the thermocouple (temp sensors) on their own individual plugs. just - and + but the single strand wire is stiff AF and wouldn't solder but I managed to twitch it on the connectors.
Anyway the Inkbirds would only give the error message. Tried everything and after many tantrums, I worked out the thermocouple wires need to extend all the way to the inkbirds themselves. You cant have a plug then normal wire to the controller. I think they transmit heat more so than current. So fucked around mainlined them and bang! Away she went.
Im nervous about squashing some bud though, I reckon I'll be disappointed. Maybe I'll grow some balls a bit later today and try at least. Need to experiment with a few strains I have and hope at least one will produce the goods!
But electrical... Fuck me I near threw the prick against the wall a few times. Thankfully there were some sacrificial lambs laying around nearby for that instead.

The supplied inkbird wiring diagram is lacking, it doesnt really show the SSR needs AC in as well as the -+ DC from the controller, Probably obvious to anyone in the know, but I needed to watch a few youtube vids to nut that out.

was a bit concerned on how the timber will handle the heat long term without cupping etc. Got the missos oven mitt and used the silicone outer. Ribbed for her pleasure!

Screwed some 20mm steel plate on top and bottom, ready to go.

Testing 123... Heated her up and give her 2 tonnes for about 20 minutes.
THE MAIN ISSUE:
I wanted to be able to disconnect the leads from controller, so had the thermocouple (temp sensors) on their own individual plugs. just - and + but the single strand wire is stiff AF and wouldn't solder but I managed to twitch it on the connectors.
Anyway the Inkbirds would only give the error message. Tried everything and after many tantrums, I worked out the thermocouple wires need to extend all the way to the inkbirds themselves. You cant have a plug then normal wire to the controller. I think they transmit heat more so than current. So fucked around mainlined them and bang! Away she went.
Im nervous about squashing some bud though, I reckon I'll be disappointed. Maybe I'll grow some balls a bit later today and try at least. Need to experiment with a few strains I have and hope at least one will produce the goods!
thefullspectrum
Curing
- User ID
- 869
First press. 
Id read and watched so much crap on the process that when I finally had the time to try it Id forgotten everything.
Used what looked to my untrained eye the best pressing strain in my arsenal. The smaller yielder of the 2 indoor AGG which smells great.
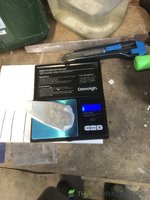
Placed 5 de-stemmed grams in a 75x50mm 100 mic bag. I turned the bag inside out prior to packing it NFI if thats the go or not. Suspect probably not.
100 degrees Celsius press. Just seems like a good honest number is all. Slowly squished the plates together warming the bud and when I felt the time was right, I give it to it. Only pushed it up to 2.5 tonnes on the gauge after 2 mins then it was all over. Story of my life
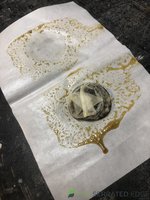
It started hissing after 20 odd seconds and and the golden nectar started to flow after about a minute . I lost a bit off the side, rookie error.
Typically cold down here so it hardened up to a dense sticky toffee like consistency after a couple of minutes
minus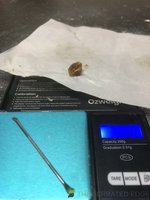
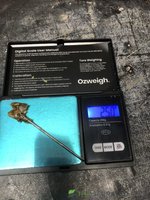
0.84 grams of Gods nectar from 5 grams of flower = 16.8% yield. ??? Not sure if I squished long or hard enough, let alone at the right temp, but was great to see something come out and begins my long journey down the rabbit hole.
Id read and watched so much crap on the process that when I finally had the time to try it Id forgotten everything.
Used what looked to my untrained eye the best pressing strain in my arsenal.
Placed 5 de-stemmed grams in a 75x50mm 100 mic bag. I turned the bag inside out prior to packing it NFI if thats the go or not. Suspect probably not.

100 degrees Celsius press. Just seems like a good honest number is all. Slowly squished the plates together warming the bud and when I felt the time was right, I give it to it. Only pushed it up to 2.5 tonnes on the gauge after 2 mins then it was all over. Story of my life
It started hissing after 20 odd seconds and and the golden nectar started to flow after about a minute . I lost a bit off the side, rookie error.

Typically cold down here so it hardened up to a dense sticky toffee like consistency after a couple of minutes

minus

0.84 grams of Gods nectar from 5 grams of flower = 16.8% yield. ??? Not sure if I squished long or hard enough, let alone at the right temp, but was great to see something come out and begins my long journey down the rabbit hole.
Porky
The Dwarf Hermie King
- User ID
- 17
Yeah that looks real nice mate!First press.
Id read and watched so much crap on the process that when I finally had the time to try it Id forgotten everything.
Used what looked to my untrained eye the best pressing strain in my arsenal.The smaller yielder of the 2 indoor AGG which smells great.
Placed 5 de-stemmed grams in a 75x50mm 100 mic bag. I turned the bag inside out prior to packing it NFI if thats the go or not. Suspect probably not.
View attachment 35807
100 degrees Celsius press. Just seems like a good honest number is all. Slowly squished the plates together warming the bud and when I felt the time was right, I give it to it. Only pushed it up to 2.5 tonnes on the gauge after 2 mins then it was all over. Story of my life
It started hissing after 20 odd seconds and and the golden nectar started to flow after about a minute . I lost a bit off the side, rookie error.
View attachment 35804
Typically cold down here so it hardened up to a dense sticky toffee like consistency after a couple of minutes
View attachment 35805
minusView attachment 35806
0.84 grams of Gods nectar from 5 grams of flower = 16.8% yield. ??? Not sure if I squished long or hard enough, let alone at the right temp, but was great to see something come out and begins my long journey down the rabbit hole.


